---
headline: SDK configuration | Opik Documentation
og:description: Configure Python and TypeScript SDKs effectively. Set up your API
key and instance URL for seamless routing and authentication.
og:site_name: Opik Documentation
og:title: SDK Configuration Guide - Opik
title: SDK configuration
canonical-url: https://www.comet.com/docs/opik/tracing/advanced/sdk_configuration
---
# SDK Configuration
This guide covers configuration for both Python and TypeScript SDKs, including basic setup, advanced options, and debugging capabilities.
## Getting Started
### Python SDK
The recommended approach to configuring the Python SDK is to use the `opik configure` command. This will prompt you to set up your API key and Opik instance URL (if applicable) to ensure proper routing and authentication. All details will be saved to a configuration file.
If you are using the Cloud version of the platform, you can configure the SDK by running:
```python
import opik
opik.configure(use_local=False)
```
You can also configure the SDK by calling [`configure`](https://www.comet.com/docs/opik/python-sdk-reference/cli.html) from the Command line:
```bash
opik configure
```
If you are self-hosting the platform, you can configure the SDK by running:
```python
import opik
opik.configure(use_local=True)
```
or from the Command line:
```bash
opik configure --use_local
```
The `configure` methods will prompt you for the necessary information and save it to a configuration file (`~/.opik.config`). When using the command line version, you can use the `-y` or `--yes` flag to automatically approve any confirmation prompts:
```bash
opik configure --yes
```
### TypeScript SDK
For the TypeScript SDK, configuration is done through environment variables, constructor options, or configuration files.
**Installation:**
```bash
npm install opik
```
**Basic Configuration:**
You can configure the Opik client using environment variables in a `.env` file:
```bash
OPIK_API_KEY="your-api-key"
OPIK_URL_OVERRIDE="https://www.comet.com/opik/api"
OPIK_PROJECT_NAME="your-project-name"
OPIK_WORKSPACE="your-workspace-name"
```
Or pass configuration directly to the constructor:
```typescript
import { Opik } from "opik";
const client = new Opik({
apiKey: "",
apiUrl: "https://www.comet.com/opik/api",
projectName: "",
workspaceName: "",
});
```
## Configuration Methods
Both SDKs support multiple configuration approaches with different precedence orders.
### Configuration Precedence
**Python SDK:** Constructor options → Environment variables → Configuration file → Defaults
**TypeScript SDK:** Constructor options → Environment variables → Configuration file (`~/.opik.config`) → Defaults
### Environment Variables
Both SDKs support environment variables for configuration. Here's a comparison of available options:
| Configuration | Python Env Variable | TypeScript Env Variable | Description |
| ------------------- | ---------------------------- | ----------------------- | ---------------------------------------------- |
| API Key | `OPIK_API_KEY` | `OPIK_API_KEY` | API key for Opik Cloud |
| URL Override | `OPIK_URL_OVERRIDE` | `OPIK_URL_OVERRIDE` | Opik server URL |
| Project Name | `OPIK_PROJECT_NAME` | `OPIK_PROJECT_NAME` | Project name |
| Workspace | `OPIK_WORKSPACE` | `OPIK_WORKSPACE` | Workspace name |
| Config Path | `OPIK_CONFIG_PATH` | `OPIK_CONFIG_PATH` | Custom config file location |
| Default LLM | `OPIK_DEFAULT_LLM` | N/A | Default model used by Python evaluation/simulation helpers |
| Track Disable | `OPIK_TRACK_DISABLE` | `OPIK_TRACK_DISABLE` | Disable tracing of traces and spans |
| Flush Timeout | `OPIK_DEFAULT_FLUSH_TIMEOUT` | N/A | Default flush timeout (Python only) |
| TLS Certificate | `OPIK_CHECK_TLS_CERTIFICATE` | N/A | Check TLS certificates (Python only) |
| Batch Delay | N/A | `OPIK_BATCH_DELAY_MS` | Batching delay in ms (TypeScript only) |
| Hold Until Flush | N/A | `OPIK_HOLD_UNTIL_FLUSH` | Hold data until manual flush (TypeScript only) |
| Console Log Level | `OPIK_CONSOLE_LOGGING_LEVEL` | N/A | Console log level (Python only) |
| File Log Level | `OPIK_FILE_LOGGING_LEVEL` | N/A | File log level (Python only) |
| Optimizer Log Level | `OPIK_OPTIMIZER_LOG_LEVEL` | N/A | Opik Optimizer SDK log level (Python only) |
| Log Level | N/A | `OPIK_LOG_LEVEL` | Logging level (TypeScript only) |
### Using .env Files
Both SDKs support `.env` files for managing environment variables. This is a good practice to avoid hardcoding secrets and to make your configuration more portable.
**For Python projects**, install `python-dotenv`:
```shell
pip install python-dotenv
```
**For TypeScript projects**, `dotenv` is automatically loaded by the SDK.
Create a `.env` file in your project's root directory:
```dotenv
# Opik Configuration
OPIK_API_KEY="YOUR_OPIK_API_KEY"
OPIK_URL_OVERRIDE="https://www.comet.com/opik/api"
OPIK_PROJECT_NAME="your-project-name"
OPIK_WORKSPACE="your-workspace-name"
OPIK_DEFAULT_LLM="openai/gpt-5-nano"
# LLM Provider API Keys (if needed)
OPENAI_API_KEY="YOUR_OPENAI_API_KEY"
# Logging Configuration (see Debug Mode and Logging section below)
OPIK_CONSOLE_LOGGING_LEVEL="WARNING" # Python: Control console output (DEBUG, INFO, WARNING, ERROR, CRITICAL)
OPIK_FILE_LOGGING_LEVEL="DEBUG" # Python: Enable file logging
OPIK_LOG_LEVEL="DEBUG" # TypeScript: Control log level
```
**Python usage with .env file:**
```python
from dotenv import load_dotenv
load_dotenv() # Load before importing opik
import opik
# Your Opik code here
```
**TypeScript usage with .env file:**
The TypeScript SDK automatically loads `.env` files, so no additional setup is required:
```typescript
import { Opik } from "opik";
// Configuration is automatically loaded from .env
const client = new Opik();
```
### Using Configuration Files
Both SDKs support configuration files for persistent settings.
#### Python SDK Configuration File
The Python SDK uses the [TOML](https://github.com/toml-lang/toml) format. The `configure` method creates this file automatically, but you can also create it manually:
```toml
[opik]
url_override = https://www.comet.com/opik/api
api_key =
workspace =
project_name =
```
```toml
[opik]
url_override = http://localhost:5173/api
workspace = default
project_name =
```
#### TypeScript SDK Configuration File
The TypeScript SDK also supports the same `~/.opik.config` file format as the Python SDK. The configuration file uses INI format internally but shares the same structure:
```ini
[opik]
url_override = https://www.comet.com/opik/api
api_key =
workspace =
project_name =
```
```ini
[opik]
url_override = http://localhost:5173/api
workspace = default
project_name =
```
By default, both SDKs look for the configuration file in your home directory (`~/.opik.config`). You can specify a
different location by setting the `OPIK_CONFIG_PATH` environment variable.
## Debug Mode and Logging
Both SDKs provide debug capabilities for troubleshooting integration issues.
### Python SDK Logging
The Python SDK provides two separate logging channels that can be configured independently:
- **Console Logging**: Controls log output to the console (stdout/stderr)
- **File Logging**: Controls log output to a file
Both channels support the following log levels: `DEBUG`, `INFO` (default), `WARNING`, `ERROR`, `CRITICAL`
#### Controlling Console Logging
To control the console log level, set the `OPIK_CONSOLE_LOGGING_LEVEL` environment variable _before_ importing `opik`:
```shell
# Reduce console output to warnings and errors only
export OPIK_CONSOLE_LOGGING_LEVEL="WARNING"
```
**Available log levels for console:**
- `DEBUG`: Show all debug information
- `INFO`: Show informational messages (default)
- `WARNING`: Show only warnings and errors
- `ERROR`: Show only errors and critical messages
- `CRITICAL`: Show only critical errors
**Using with .env file:**
```dotenv
# Console Logging (reduce noise)
OPIK_CONSOLE_LOGGING_LEVEL="WARNING"
```
The Opik SDK manages its own logging configuration. Setting log levels through Python's standard `logging.getLogger("opik").setLevel()` will not work. Always use the `OPIK_CONSOLE_LOGGING_LEVEL` environment variable to control console output.
#### Enabling File Logging for Debug
To enable debug mode with file logging, set these environment variables _before_ importing `opik`:
```shell
export OPIK_FILE_LOGGING_LEVEL="DEBUG"
export OPIK_LOGGING_FILE=".tmp/opik-debug-$(date +%Y%m%d).log"
```
**Using with .env file:**
```dotenv
# File Logging (for debug)
OPIK_FILE_LOGGING_LEVEL="DEBUG"
OPIK_LOGGING_FILE=".tmp/opik-debug.log"
```
**Example combining both console and file logging:**
```dotenv
# Opik Logging Configuration
# Console: Show only warnings and errors
OPIK_CONSOLE_LOGGING_LEVEL="WARNING"
# File: Log everything for debugging
OPIK_FILE_LOGGING_LEVEL="DEBUG"
OPIK_LOGGING_FILE=".tmp/opik-debug.log"
```
Then in your Python script:
```python
from dotenv import load_dotenv
load_dotenv() # Load before importing opik
import opik
# Your Opik code here - console will be quiet, debug logs go to file
```
### TypeScript SDK Debug Mode
The TypeScript SDK uses structured logging with configurable levels:
**Available log levels:** `SILLY`, `TRACE`, `DEBUG`, `INFO` (default), `WARN`, `ERROR`, `FATAL`
**Enable debug logging:**
```bash
export OPIK_LOG_LEVEL="DEBUG"
```
**Or in .env file:**
```dotenv
OPIK_LOG_LEVEL="DEBUG"
```
**Programmatic control:**
```typescript
import { setLoggerLevel, disableLogger } from "opik";
// Set log level
setLoggerLevel("DEBUG");
// Disable logging entirely
disableLogger();
```
## Advanced Configuration
### Python SDK Advanced Options
#### HTTP Client Configuration
The Opik Python SDK uses the [httpx](https://www.python-httpx.org/) library to make HTTP requests.
The default configuration applied to the HTTP client is suitable for most use cases, but you can customize
it by registering a custom httpx client hook as in following example:
```python
import opik.hooks
def custom_auth_client_hook(client: httpx.Client) -> None:
client.auth = CustomAuth()
hook = opik.hooks.HttpxClientHook(
client_init_arguments={"trust_env": False},
client_modifier=custom_auth_client_hook,
)
opik.hooks.add_httpx_client_hook(hook)
# Use the Opik SDK as usual
```
Make sure to add the hook before using the Opik SDK.
### TypeScript SDK Advanced Options
#### Batching Configuration
The TypeScript SDK uses batching for optimal performance. You can configure batching behavior:
```typescript
import { Opik } from "opik";
const client = new Opik({
// Custom batching delay (default: 300ms)
batchDelayMs: 1000,
// Hold data until manual flush (default: false)
holdUntilFlush: true,
// Custom headers
headers: {
"Custom-Header": "value",
},
});
// Manual flushing
await client.flush();
```
#### Global Flush Control
```typescript
import { flushAll } from "opik";
// Flush all instantiated clients
await flushAll();
```
## Configuration Reference
### Python SDK Configuration Values
| Configuration Name | Environment Variable | Description |
| -------------------------- | ---------------------------- | ------------------------------------------------------------------------- |
| url_override | `OPIK_URL_OVERRIDE` | The URL of the Opik server - Defaults to `https://www.comet.com/opik/api` |
| api_key | `OPIK_API_KEY` | The API key - Only required for Opik Cloud |
| workspace | `OPIK_WORKSPACE` | The workspace name - Optional |
| project_name | `OPIK_PROJECT_NAME` | The project name to use |
| N/A | `OPIK_DEFAULT_LLM` | Default LLM used by Python evaluation/simulation helpers - Defaults to `openai/gpt-5-nano` |
| opik_track_disable | `OPIK_TRACK_DISABLE` | Disable tracking of traces and spans - Defaults to `false` |
| default_flush_timeout | `OPIK_DEFAULT_FLUSH_TIMEOUT` | Default flush timeout - Defaults to no timeout |
| opik_check_tls_certificate | `OPIK_CHECK_TLS_CERTIFICATE` | Check TLS certificate - Defaults to `true` |
| console_logging_level | `OPIK_CONSOLE_LOGGING_LEVEL` | Console logging level - Defaults to `INFO` |
| file_logging_level | `OPIK_FILE_LOGGING_LEVEL` | File logging level - Not configured by default |
| logging_file | `OPIK_LOGGING_FILE` | File to write logs to - Defaults to `opik.log` |
### TypeScript SDK Configuration Values
| Configuration Name | Environment Variable | Description |
| ------------------ | ----------------------- | -------------------------------------------------------------------- |
| apiUrl | `OPIK_URL_OVERRIDE` | The URL of the Opik server - Defaults to `http://localhost:5173/api` |
| apiKey | `OPIK_API_KEY` | The API key - Required for Opik Cloud |
| workspaceName | `OPIK_WORKSPACE` | The workspace name - Optional |
| projectName | `OPIK_PROJECT_NAME` | The project name - Defaults to `Default Project` |
| batchDelayMs | `OPIK_BATCH_DELAY_MS` | Batching delay in milliseconds - Defaults to `300` |
| holdUntilFlush | `OPIK_HOLD_UNTIL_FLUSH` | Hold data until manual flush - Defaults to `false` |
| trackDisable | `OPIK_TRACK_DISABLE` | Disable tracing of traces and spans - Defaults to `false` |
| N/A | `OPIK_LOG_LEVEL` | Logging level - Defaults to `INFO` |
| N/A | `OPIK_CONFIG_PATH` | Custom config file location |
## Troubleshooting
### Python SDK Troubleshooting
#### SSL Certificate Error
If you encounter the following error:
```
[SSL: CERTIFICATE_VERIFY_FAILED] certificate verify failed: self-signed certificate in certificate chain (_ssl.c:1006)
```
You can resolve it by either:
- Disable the TLS certificate check by setting the `OPIK_CHECK_TLS_CERTIFICATE` environment variable to `false`
- Add the Opik server's certificate to your trusted certificates by setting the `REQUESTS_CA_BUNDLE` environment variable
#### Health Check Command
If you are experiencing problems with the Python SDK, such as receiving 400 or 500 errors from the backend, or being unable to connect at all, run the health check command:
```bash
opik healthcheck
```
This command will analyze your configuration and backend connectivity, providing useful insights into potential issues.
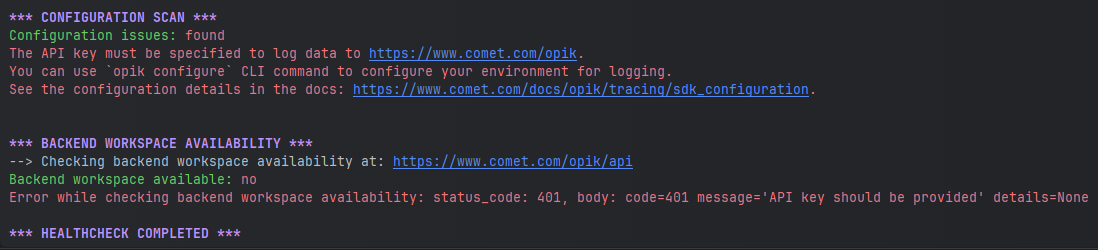 Reviewing the health check output can help pinpoint the source of the problem and suggest possible resolutions.
### TypeScript SDK Troubleshooting
#### Configuration Validation Errors
The TypeScript SDK validates configuration at startup. Common errors:
- **"OPIK_URL_OVERRIDE is not set"**: Set the `OPIK_URL_OVERRIDE` environment variable
- **"OPIK_API_KEY is not set"**: Required for Opik Cloud deployments
- **"OPIK_WORKSPACE is not set"**: Optional, but can be set for Opik Cloud deployments
#### Debug Logging
Enable debug logging to troubleshoot issues:
```bash
export OPIK_LOG_LEVEL="DEBUG"
```
If you are using the Opik Optimizer SDK, you can also enable optimizer-side debug logs:
```bash
export OPIK_OPTIMIZER_LOG_LEVEL="DEBUG"
```
Or programmatically:
```typescript
import { setLoggerLevel } from "opik";
setLoggerLevel("DEBUG");
```
#### Batch Queue Issues
If data isn't appearing in Opik:
1. **Check if data is batched**: Call `await client.flush()` to force sending
2. **Verify configuration**: Ensure correct API URL and credentials
3. **Check network connectivity**: Verify firewall and proxy settings
### General Troubleshooting
#### Environment Variables Not Loading
1. **Python**: Ensure `load_dotenv()` is called before importing `opik`
2. **TypeScript**: The SDK automatically loads `.env` files
3. **Verify file location**: `.env` file should be in project root
4. **Check file format**: No spaces around `=` in `.env` files
#### Configuration File Issues
1. **File location**: Default is `~/.opik.config`
2. **Custom location**: Use `OPIK_CONFIG_PATH` environment variable
3. **File format**: Python uses TOML, TypeScript uses INI format
4. **Permissions**: Ensure file is readable by your application
Reviewing the health check output can help pinpoint the source of the problem and suggest possible resolutions.
### TypeScript SDK Troubleshooting
#### Configuration Validation Errors
The TypeScript SDK validates configuration at startup. Common errors:
- **"OPIK_URL_OVERRIDE is not set"**: Set the `OPIK_URL_OVERRIDE` environment variable
- **"OPIK_API_KEY is not set"**: Required for Opik Cloud deployments
- **"OPIK_WORKSPACE is not set"**: Optional, but can be set for Opik Cloud deployments
#### Debug Logging
Enable debug logging to troubleshoot issues:
```bash
export OPIK_LOG_LEVEL="DEBUG"
```
If you are using the Opik Optimizer SDK, you can also enable optimizer-side debug logs:
```bash
export OPIK_OPTIMIZER_LOG_LEVEL="DEBUG"
```
Or programmatically:
```typescript
import { setLoggerLevel } from "opik";
setLoggerLevel("DEBUG");
```
#### Batch Queue Issues
If data isn't appearing in Opik:
1. **Check if data is batched**: Call `await client.flush()` to force sending
2. **Verify configuration**: Ensure correct API URL and credentials
3. **Check network connectivity**: Verify firewall and proxy settings
### General Troubleshooting
#### Environment Variables Not Loading
1. **Python**: Ensure `load_dotenv()` is called before importing `opik`
2. **TypeScript**: The SDK automatically loads `.env` files
3. **Verify file location**: `.env` file should be in project root
4. **Check file format**: No spaces around `=` in `.env` files
#### Configuration File Issues
1. **File location**: Default is `~/.opik.config`
2. **Custom location**: Use `OPIK_CONFIG_PATH` environment variable
3. **File format**: Python uses TOML, TypeScript uses INI format
4. **Permissions**: Ensure file is readable by your application